Updated 12/31/2025
My First Experience with Kali Linux
After watching two YouTube videos, "Kali on Raspberry Pi 5 can now HACK WiFi (No adapter needed)" [1] and "Hack WiFi with a $15 Raspberry Pi Zero and Kali Linux", [2] both by David Bombal, I decided to give Kali Linux a spin.
To hack Wi-Fi, you need a WiFi adapter that can be put into "monitor mode" and capture packets. Monitor mode is just additional software that is included in the driver. However, many vendors do not go to the trouble and expense of writing drivers that support "monitor mode".
The Raspberry Pi 4 and 5 use the same Broadcom Wi-Fi chip (43455). Broadcom's driver, "brcmfmac", does not support monitor mode, However, the Nexmon project on GitHub [3] adds monitor support to Broadcom/Cypress Wi-Fi chips. In a Kali Linux Offical Blog, on July 22, 2025, Kali OS anounced that they add Nexmon support to their OS [4]. However five months later Kali's Offical Documentation still claims that the Raspberry Pi Image does not yet include support for Nexmon, and you need an external USB Wi-Fi adapter [5]. Thus, the documenation is five months behind and counting!
In the video David Bombal uses "Wifite" to crack an WPA2 password. Wifite waits for a handshake and captures it. It then uses a dictionary of common passwords to see if one of them produces the same output as the captured handshake did.
References
- 2025/10/3 - David Bombal - Kali on Raspberry Pi 5 can now HACK WiFi (No adapter needed)
- 2025/10/10 - David Bombal - Hack WiFi with a $15 Raspberry Pi Zero and Kali Linux
- What is nexmon? - GitHub
- Kali - 2025/7/22 - The Raspberry Pi's Wi-Fi Glow-Up
- Kali Documentation Raspberry Pi 5
Installation of Kali Linux
Kali Linux can be installed directly from the Raspberry "Imager" or from the Kali Linux website [5]. To download the image from the Kali website, choose Arm64 and then the model number of the Raspberry Pi. After downloading the image, use the Raspberry Pi "Imager" to install it by selecting "Custom OS Installation".
RPi-imager 2.0 does not work on Debrian 13. It starts off saying it is going to zero the first and last sectors of the boot, and then gives an error and then hangs.
After the installation, I ran:
sudo apt update && sudo apt upgrade -y
This resulted in over 750 packages being updated. After rebooting, I again checked to see if there were any updates. To my surprise, there were three packages that were being held back. These packages cannot be installed in the normal way: sudo update && sudo upgrade -y.
After some trial and error, I was able to install them by [3]:
sudo su
apt update -y && apt upgrade -y && apt dist-upgrade
However, I do not recommend this. Later I reinstalled Kali Linux, and I did not install the three packages.
David Bombal's YouTube Example
For my tests, I used two wireless networks:
- An old D-Link wireless router, model # DIR-655. This router is Wi-Fi b/g and n compatible. It uses only the 2.4 GHz band.
- A reasonable new Arris wireless, CABLE router, model # SBC7600-AC. This router is Wi-Fi b, g, n, a and ac compatible. This router uses the 2.4 GHz and the 5 GHz bands.
Before you run wifite, you should set the country for Wi-Fi:
sudo iw reg set US
Note US must be capitalized.
Also note that this is mutable. That is, the Wi-Fi country setting will not survive a reboot. I currently do not know how to make it immutable.
Check that the country code was set correctly:
iw reg get
Now run wifite:
sudo wifite --kill
I was only able to successfully complete the example with the Arris wireless network. However, I had problems with the D-Link wireless network. I repeatedly got a "Waiting for the target to appear" timeout error. Finally, I connected an external antenna (Netgear AC1200) to same Raspberry Pi 5B. It ran successfully the first time. This will frustrate a new user to no end.
I captured the passwords spiderman, superman, and cyberman. The dictionary did not contain the password rayfranco. It takes approximately 15 minutes, on a Raspberry Pi 5B with 8 GB of RAM 512 GB NVM, to run through all the passwords in the dictionary.
After wifite captures the handshake and discovers the password, it saves the values. The next time you run wifite, it will use the captured values and not wait for a handshake. I currently do not know how to clear this.
By default, wifite only scans the 2.4 GHz band. To scan the 5 GHz band, use the -5 option [6].
sudo wifite -5
Kali Linux's Many Network Managers
| DHCP Clients | Interface Configuration File(s) | Service | |
|---|---|---|---|
| Cloud-init | An abstraction layer that works with either the NetworkManager or Systemd-Networkd | /etc/cloud/cloud.cfg /etc/cloud/could.cfg.d/ | cloud-init.network.service |
| Netplan | An abstraction layer that works with either the NetworkManager or Systemd-Networkd | /etc/netplan/*.yaml | |
| NetworkManager | /etc/NetworkManager/NetworkManager.conf /etc/NetworkManager/conf.d/ |
/etc/NetworkManager/system-connections/ | NetworkManager.service |
| Systemd-Networkd | /etc/systemd/networkd.conf /etc/systemd/network/ |
/run/systemd/network/ /usr/lib/systemd/network/ | systemd-networkd.service |
| ENI (dhclient/ifupdown) | /etc/network/interfaces /etc/network/interfaces.d/ |
networking.service? | |
| dhcpcd (dhcp client daemon) | /etc/hdcpd.conf | ||
Cloud-init refers to hdclient/ifupdown as just ENI (etc/network/interfaces).
Kali 2025.4 (2025-07-21) on a Raspberry Pi 5B
On a Raspberry Pi 5B all four dhcp clients NetworkManger, Systemd-Networkd, dhcpcd, and ifupdown are active and the two abstraction layers, Netplan and Cloud-init.
If you run:
ip addr
you will see two dynamic IPv4 addresses and two IPv6 addresses for the ethernet adapter, eth0, that were assigned by the router.
One of two IP addresses is from the file /etc/network.interfaces.d/eth0:
auto eth0
    allow-hotplug eth0
    iface eth0 inet dhcp
You can edit or delete this file.
Kali Linux version 2025.4 does not use the Internet System Consortium DHCP client, dhclient, which first appeared in 1999 and stopped being maintained in Q1 2022. I believe netplan and the NetworkManger are managing this.
The second IP address is from Systemd-Networkd. You create configuration files for the interfaces and place them in the directory: "/etc/systemd/network/". Configuration file names should start with a two-digit priority number (lower number is the higher priority), and their file names must have the suffix ".network". In our case, there are no *.network files in the "/etc/systemd/network directory (only .link files). However, there are ".network" files in the directory "/run/systemd/network": 10-netplan-etho.network. Its contents are:
[Match]
PermanentMACAddress=d8:3a:dd:e4:c9:e1
Name=eth0

[Network]
DHCP=yes
LinkLocalAddressing=ipv6

[DHCP]
RouteMetric=100
UseMTU=true
This file was generated by netplan. You cannot make permanent changes to or delete this file. It gets restored every time the system boots.
However, you can override it, by creating a systemd-networkd configuration file with a higher priority (lower two-digit prefix).
There is another important configuration file at /etc/netplan/. This file is 50-cloud-init.yaml. Its contents are:
network:
  version: 2
  ethernets:
    eth0:
      match:
        macaddress: "d8:3a:dd:e4:c9:e1"
      dhcp4: true
      dhcp6: true
      set-name: "eth0"
After the version number, there is no "renderer: NetworkManger" statement, and netplan's default renderer is systemd-networkd. This file was generated by cloud-init, but you can modify it. The question is, should you?
Finally, there is the file /etc/resolv.conf:
Generated by dhcpcd from eth0.dhcp
# /etc/resolv.conf.head can replace this line
domain attlocal.net
nameserver 192.168.37.1
# /etc/resolv.conf.tail can replace this line
I do not have an explanation for why hdcpcd is controlling the contents of this file.
Linux does allow assigning multiple IP addresses to the same interface, but you should never have two different dhcp clients managing (fighting over control) the same interface.
The easy thing to do is to delete the file /etc/network/inferfaces.d/eth0, but you want to assign a Static IP address, this might not be the thing to do. See the next section.
Assigning a Static IPv4 Address
If you want to access this machine remotely via ssh or vnc then you need to assign it a static IPv4 address.
One way of doing is to modify /etc/network/interfaces.d/eth0. That is:
auto eth0
    allow-hotplug eth0
#   iface eth0 inet dhcp

   iface eth0 inet static
      address 192.168.37.56
      netmask 255.255.255.0
      gateway 192.168.37.1
      dns-nameservers 192.168.37.1
To keep system-network from also managing eth0, in the /etc/systemd/network directory, create the configuration file 09-unmanged-eth0.network where 09-unmanaged-eth0.network is:
[Match]
Name=eth0

[Link]
Unmanaged=yes
Since this file has a higher priority 09 vs 10, it will override /run/10-netplan-eth0.network.
You should also add the following to the end of /etc/dhcpcd.conf: "denyinterfaces eth0".
Another option is to delete /etc/network/interface.d/eth0 and to use the NetworkManger to manage eth0. For some reason, must explicitly state that eth0 is being managed by the NetworkManager. That is in the /etc/NetworkManager/conf.d directory create "10-managed-eth0.conf" where 10-mangaged-eth0.conf is:
[main]

[device]
match-device=interface-name:eth0
managed=true
Do not forget to keep systemd-networkd and dhcpcd from managing eth0 with the above (previous) code. Only one dhcp client should manage a particular interface.
NetworkManager [ifupdown] managed=yes
If in a NetworkManager configuration file, you have:
[ifupdown]
managed=yes
then NetworkManager will manage the interface using the values in /etc/network/interfaces.conf or in /etc/network/interfaces.d/*.conf. It does not mean that if you have a profile file in /etc/NetworkManager/system-connections/ for the same interface that it will use the profile file.
For Desktops with the NetworkManager, under the network icon, edit connections, you should see a virtual profile name for the interface defined in /etc/network/interfaces.d/*conf. Typical the virtual profile name will be the interface-name or ifupdown(interface-name). You can temporarily change the values with the NetworkManager GUI, but upon reboot, the values in /etc/nework/interfaces.d/*.conf will be restored.Hints
- use:
sudo systemctl list-units --type=service
to search for active and failed services.
- To search for what is setting a static address, do a recursive grep.
in /etc/. For example, if you are trying to determine what set 192.168.1.40:
grep -r 192.168.1.40 /etc
Kali Linix on Inter(x86) and Amd64
None of this so called "progress" is in Kali Linux ver 2025.4 for Intel/Amd processors. I stalled Kali Linux on an HP 800 EleteDesk G6 i7-10700T. Netplan is not installed. Hence, no /run/systemd/network/ directory nor /run/systemd/network/10-netplan-eth0.conf. None of this non-sense that someone call "progress". It just works, and NetworkManager manages eth0.
References
- Raspberry Pi Forum - Kali Linux Pi5 - 2 dhcp IP Addresses on eth0
- Kali Linux Forum - Latest Pi kali Image has 2 dynamic IP addresses on eth0?
- Stack-Exchange: How can I make dhcpcd ignore an interface?
- Ask Ubuntu - Ethernet device not managed
- LinuxQuestions.org - Disable network interface in systemd-networkd
- Solve Raspberry Pi network problems
- Arch Linux Wiki : Systemd-Networkd
- Configuring the /etc/network/interfaces File on Raspberry Pi
- Configuring Networking on The Raspberry Pi
- RPI4 Network Lesson
- Netplan network configuration tutorial for beginners
- Netplan - The network configuration abstraction renderer
- Netplan Documentation - YAML configuration
- FreeDesktop.org - NetworkManager.conf
- Network Manager on Linux with Examples
- Debian Wiki - NetworkManager
VMWare
David Bombal and OTW like to run Kali Linux in a virtual machine - preferably VMWare, which is now free for personal use.
References
- 2025/10/3 - David Bombal - Kali on Raspberry Pi 5 can now HACK WiFi (No adapter needed)
- 2025/10/10 - David Bombal - Hack WiFi with a $15 Raspberry Pi Zero and Kali Linux
- What is nexmon? - GitHub
- Kali - 2025/7/22 - The Raspberry Pi's Wi-Fi Glow-Up
- https://www.kali.org
- [SOLVED] Fixing “Unable to Locate Package linux-headers-6.5.0-kali3-amd64” Error in Kali Linux 2024
- Wifite Basics
- Manual Network Configuration in Linux and How to Set a Static IP Address
- Systemd.network -- Network Configuration
- How to Disable Network Interfaces on Boot in Debian 12 Bookworm
WiFi Password Cracking
Most password cracking packages use aircrack-ng. There may be a wrapper around it so you do not what it is using.
Aircrack-ng offers training courses.
See recommend hardware for their training courses
You can use cloud resources for cracking i.e. hack-the-bock and try-to-hack-me
References
Bluetooth
Bluetooth was developed by a Swedish company, and it is named after a 10-Centry Danish King.
Bluetooth has a minimal distance of 10 meters. There is no maximum distance. Some adapters can go over 100 meters.
To pair two Bluetooth devices, they have to be in "discovery" mode.
When in discovery mode, the following information is broadcast:
- Name
- Class
- List of Services
- Technical Information
When and how to put a device into the discovery mode, depends on the device. The instructions for putting a device into discovery mode depend on the device. However in order to pair, most Bluetooth devices will go into discover mode immediately after being powered on (Apple keyboards and mice, Logitech Mouse).
To scan for WiFi devices with Kali, I followed reference [2 - time (14:15)]:
Verify that you can see your Bluetooth Adapter:
lsusb
Commands from a Host are sent to a physically connected Bluetooth device over the Host Controller Interface (hci) , which is a 3-wire UART [1].
To see if your Bluetooth device is UP and running, execute:hciconfig
If down, bring it up:
sudo hciconfig hci0 up
List commands of hcitool:
hcitool -h
Do a simple scan:
sudo hcitool scan
If you have more than one Bluetooth adapter, you need to specify which adapter to use in the scan. For example:
sudo hcitool -l hci1 scan
To get the scan to detect any Bluetooth devices, I had to put them in the discovery mode (cut off and back on). I was able to detect Apple Magic Keyboards and Apple Magic Mouse, and my Android Tracfone. I could not detect my Logitech Mouse and EWA Pro Wireless Speakers. It is believed that these devices paired too soon and came out of the discovery mode before they could be scanned. When I cut Bluetooth off on the devices that the EWA Speaker was pairing to, I was able to scan and detect the speaker. I tried this with the Logitech mouse, but I was not succesful.
The following observations were made:
- Apple keyboards immediately after being powered on
- Tracfone broadcast when it powered and display showing on
- EWA Pro Wireless Speaker when pairing
- Logitech Mouse when pairing
Hcitool scan only scans for classic Bluetooth devices. To scan for Bluetooth Low Energy (BLE) devices use the command:
sudo hcitool lescan
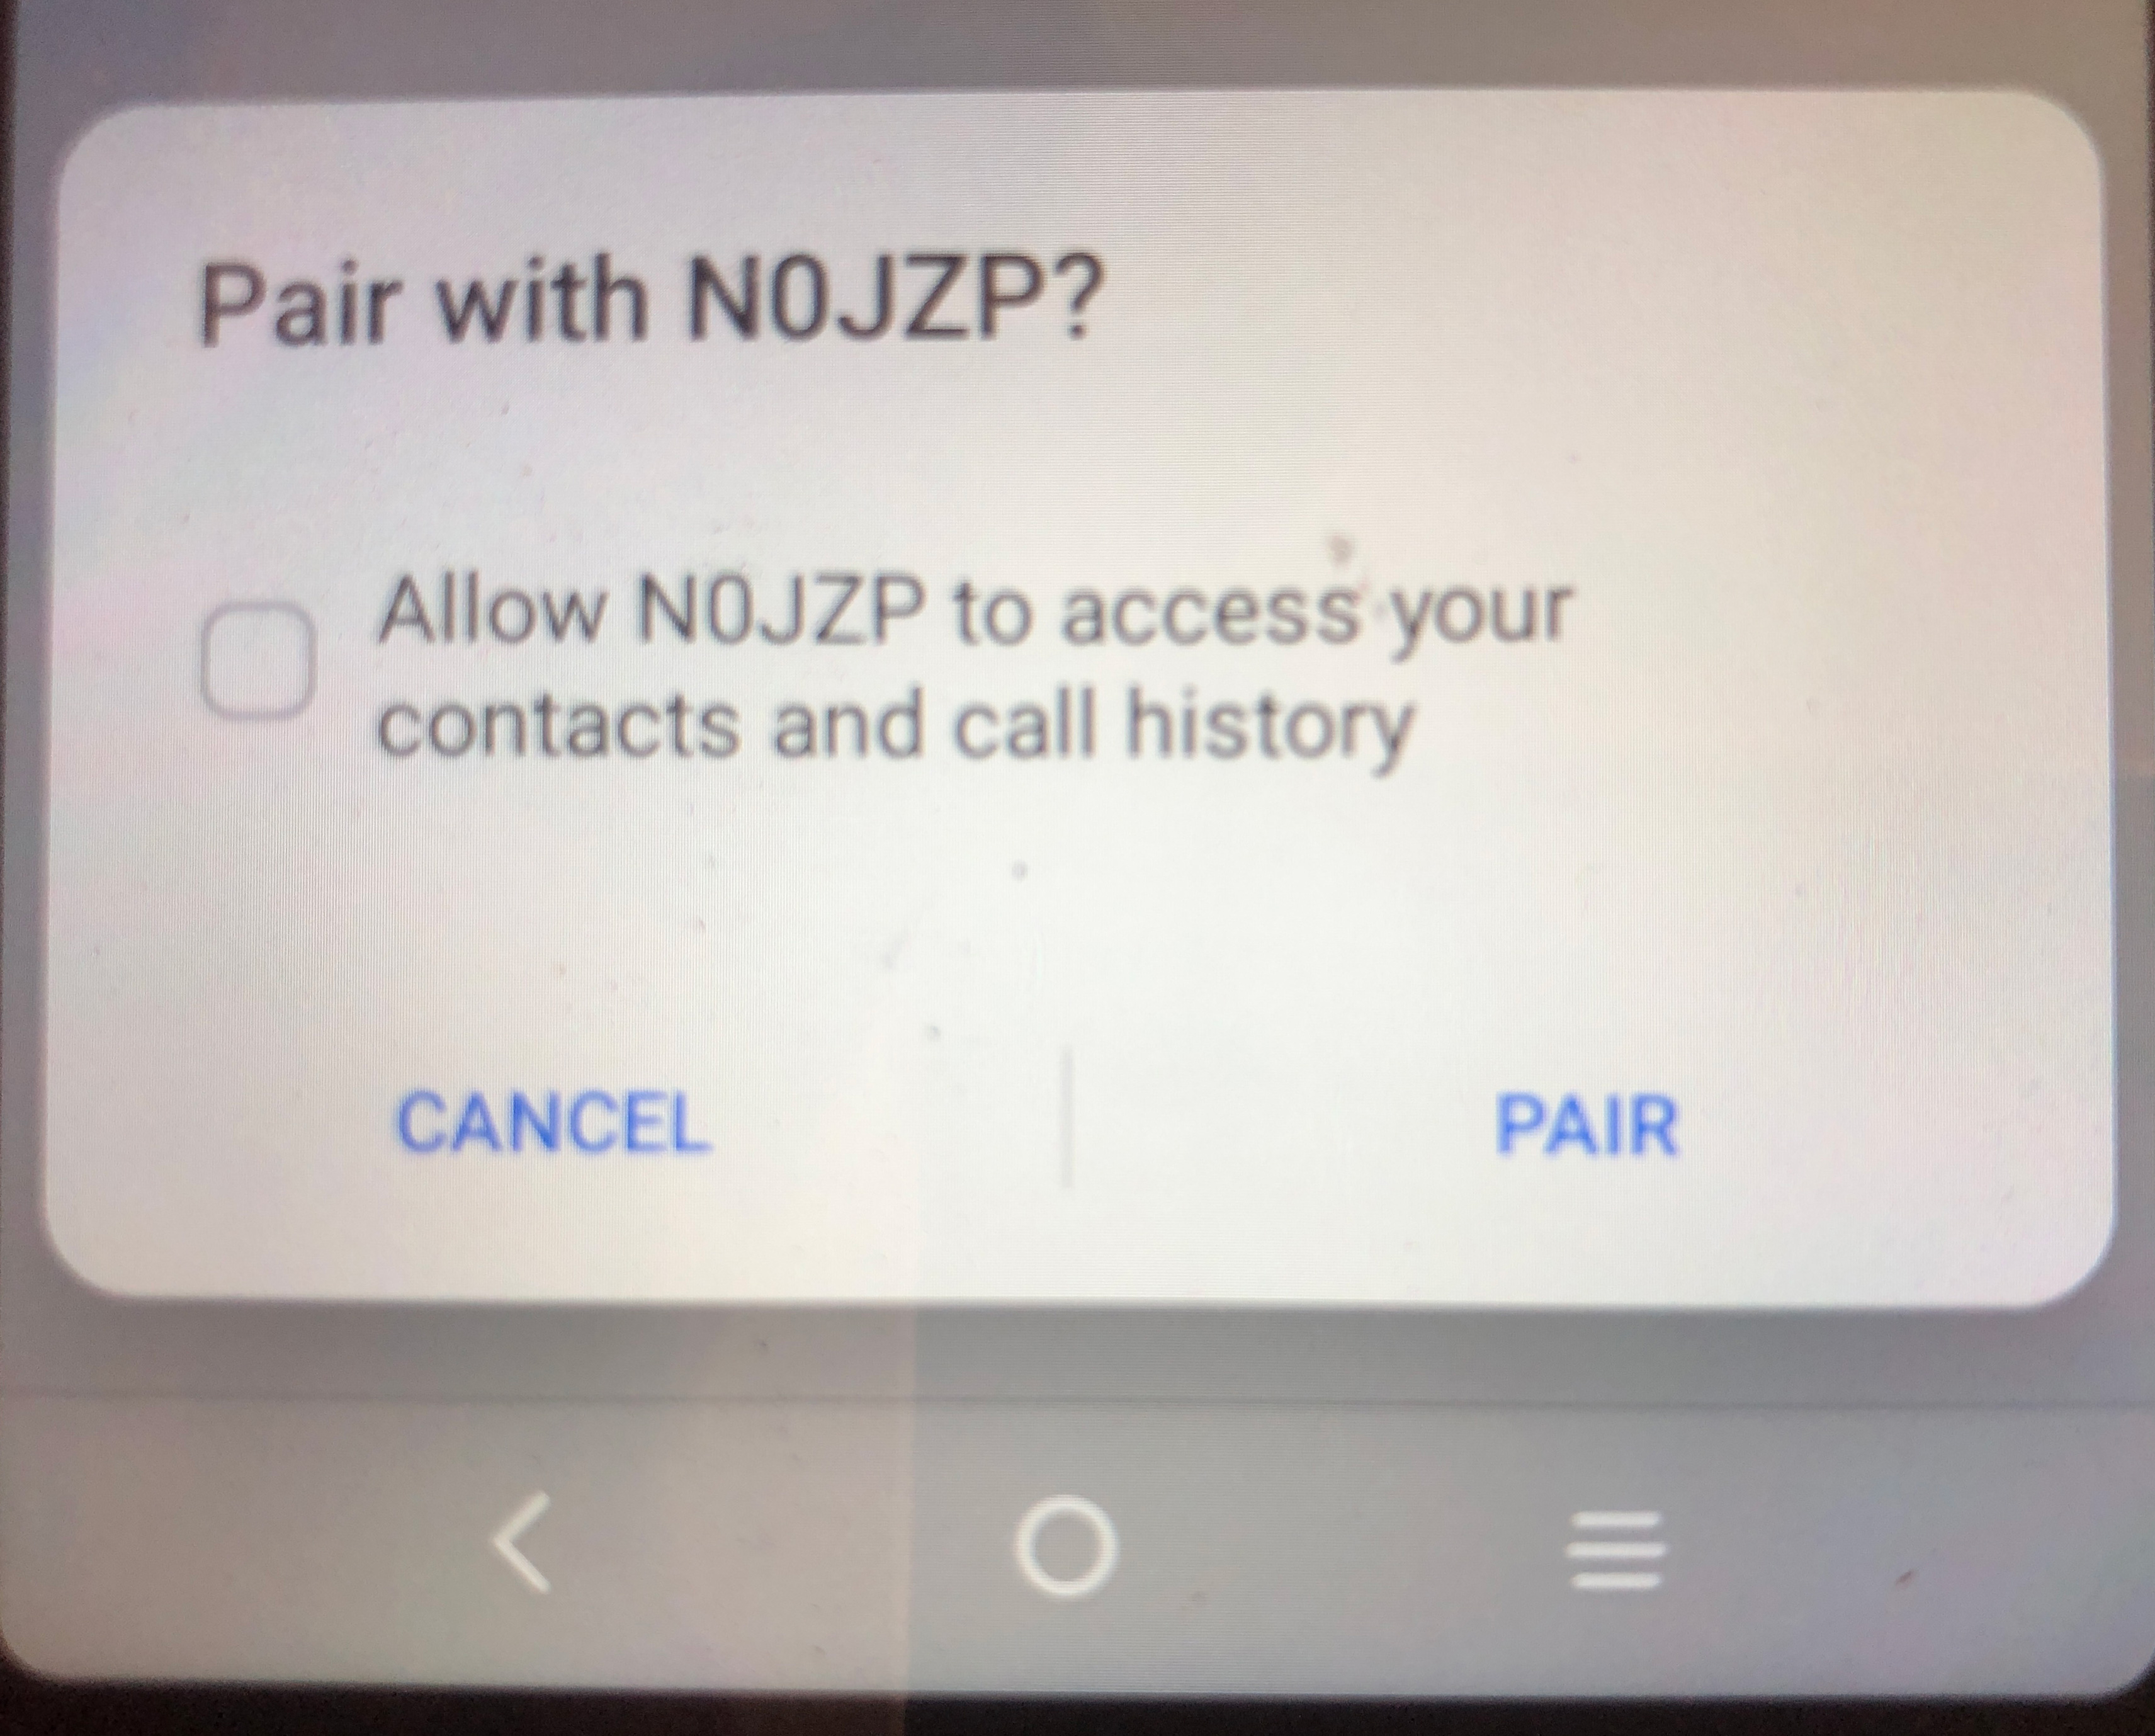
The low energy scan detected my "Tiles and other devices. One of the low energy bluetooth devices had the name NOJZP. By doing a reverse look up on the mac address, I learned this was the Nest (Google) thermostat in my shop.
I could also see NOJZP with an Android phone. When I tried to connect to this with the phone. It requested to download my contact list and phone history - UNBELEIVABLE.
References
Most Linux distributions have a GUI tool for connecting to Bluetooth devices. However. when scanning for devices, they usually only give the name of the device, Kali's GUI supplies both the name and the mac address. If you do not reconize the name, then you can do a reverse mac address inquire on the web and determe the manufacture of the device.
Bluetooth mac addresses:
| b4:3a:dd | Raspberry Pi |
| 10:cf:0f | Apple |
| 64:0b:d7 | Apple |
| b4:69:5f | TCT Mobile LTD - A3 Android Tracfone |
| 18:54:30 | Nest Labs (Google) Thermostat |
| e8:95:ba | Title |
| c7:d4:ae | Title |
| d6:c4:59 | Title |
| b4:69:5f | TCL Android Phone |
| e9:75:d8 | Raytac/Nordic-Semi |
One of OTW's favorite tools is "Hashcat" [3].
Conclusions
You can now use a Raspberry Pi with Kali Linux to scan for WiFi and Bluetooth devices.
References
- Wikipedia - Bluetooth
- Youtube - David-Bombal - How they use Bluetooth to target your car
- Wikipedia - List of Bluetooth Protocols
- Arch Linux - Network configuration/Wireless
- Scanning WiFi networks
- Linux Basics or Hackers (2nd Ed) - page 51
Bluetooth Low Energy (BLE)
- Amazon Sidewalk
Bluetooth Low Energy (BLE)
Range: 100 meters
Advertises: The Device, Name, ID and Services Offered.
Do not use a unique name for your Wi-Fi [2].
Can determine user by Wi-Fi devices his phone is looking for [2].
Even Low Pressure Tire sensors can be tracked.
To determine what radios are inside devices look at the FCC Filing.
References
- Reviving Connections: A Comprehensive Guide to Fixing Bluetooth Low Energy Issues
- YouTube - David Bombel and Matthew Edmondson - How to Track the People Tracking YOU
- GetHub Code Chasing-Your-Tail-NG
- https://www.argeliuslabs.com
- Wired - Matt Edmondson -This Anti-Tracking Tool Checks If You’re Being Followed
- Wigle.net - All the Networks - Found by Everyone.
- 2024 - TechRadar - There's a secret radio inside Apple's new Macs and iPads – here's what it does
References
- Youtube - David-Bombal - How they use Bluetooth to target your car
- Youtube - David-Bombal - Why People Buy the WRONG Laptops for Hacking & Recommended Bluetooth Adapters
- Youtube - David-Bombal - Hacking Tools (with demos) that you need to learn in 2025
- Youtube - David-Bombal - Top Privacy Tools and Tips for 2025!
Wi-Fi Security and Privacy
If you use a unique name for your ssid, someone can determine your GPS coordinates, IP addresses, MAC Addresses, and the level of your encryption.
WiGLE.net [1][2]
Wireless Geographical Logging Engine (WiGLE) is a website that has been matching wi-fi names to geographical locations since 2001. By 2019, WiGLE had over 551 million networks recorded. WiGLE has an Android app that user can use to collect and upload data to its database.
Kismet
Kismet is a network detector, sniffer program. It is free software distributed under the GNU General Public License. Kimet works with most wireless cards that support raw monitoring. Kismet works passively without sending any loggable packets. Kismet can even detect what level of wireless encryption is being used. Kismet can log sniffed packets and save them in a format compatible with tcpdump, Wireshark, Airsnort or WiGLE. If a GPS receiver is available. Kismet supports logging network geographical coordinates.
Kismet is distributed with Kali Linux.
In lieu of driving in a car and collecting wi-fi names and locations, drones can be used [5].
Solutions
Chose a common name for your ssid i.e. Netgear, Linksys, Wireless, Default, and change it every 6 months.
Monitor Mode - To discover the name of the hidden network, users need to use software and 802.11 adapters that support monitor mode: capturing packets in the air without connecting (associating) with any access point. These captured frames can then be analyzed in programs like Wireshark. Wireshark can analyze 802.11 management, control, and data frames and to gather information about a specific network.
References
- Wikipedia - WiGLE
- Wigle.net - All the Networks - Found by Everyone.
- Wikipedia - Kismet (Software)
- Kismet Website
- What is the Role of Drones in Modern Wardriving?
- Fractional CISO - Should you hide your Wi-Fi SSID?
- Why SSID Hiding Is Not Secure
- Hiding Your Wi-Fi Network in 2025: The Pros and Cons of SSID Broadcasting
- Changing Your Default WiFi Network Name in 2025: Security, Privacy, and Creativity
- David Bombal - 2025/10/03- Kali on Raspberry Pi 5 can now HACK WiFi (No adapter needed)
- https://www.kali.org
- https://www.kali.org
Radios
Hackers prefer Alfa and Panda radios. They have drivers that support monitor and injection modes.
EDUP Model EP-AC-1635
The EDUP Model EP-AC-1635 is a USB Wireless Dual-Band 2.4/5GHz Wi-Fi (b/g/n/a/ac) adapter. Its maximum transfer rate is 600 MB/sec. It uses the Realtek 8812AU/8821 chip. I used this on one of my Windows PC's, and it performed excellently.
I presently cannot get it to work with Linux. However:
lsusb
does list the Wi-Fi radio.
Netgear AC200 Wi-Fi USB 3.0 Adapter
- HP Elite Desk - Not Recognized
- Raspberry Pi 5 - Recognized
Wi-Fi b/g/n USB 2.0
This adapter uses the Ralink MT7601 chip.
- HP Elite Desk - Not Recognized
- Raspberry Pi 5 - Recognized
Nordic nRF52840 Bluetooth Development kit
Occupy the Web (OTW) likes the Bluetooth Dongle, Nordic Semiconductor nRF52840 [1 (24:30]. I ordered a similar RayTac nRF52840 device from Amazon.
The device came with no documentation - not even a link to RayTac's website.
This is a development kit. I just wanted a Bluetooth adapter that would scan for BLE devices. This device is far from that. It only runs on certain OS's [8], and you have to download software from RayTac, Nordic Semiconductor, and a JLink (a 3rd party).
The first thing you have to do is install Nordic Semiconductor's "nRF Connect" desktop Application. This application is available for Windows (64-bit), Windows (32-bit), Mac OS (Apple Silcone), Mac OS (Intel) and Linux (x86).
However, it click on nRF Connect's documenation link, you will find further requirements for the OS's []
Hence, the development kit software and OS is not compatible with the Raspberry Pi .
The device came with no documentation - not even a link to RayTac's website.
Plugging the device into the USB C port of my HP EliteDesk Gen 5 (Debian 13 - Trixie), and scanning for Bluetooth devices with a Raspberry Pi 5 (kali) using the GUI (top right corner of the desktop), the device was identified as:
MDBT50Q-CX-40
mac address: E9:75:D8:3D:CA:B1
You can also get the device name, MDBT500-CX-40, but not the mac address, by just doing a Bluetooth GUI scan on the EliteDesk with the device plugged into the EliteDesk. It also says the device is "Not Set Up".
Executing:
lsusb
Results in:
Bus 001 Device 003: ID 1915:521a Nordic Semiconductor ASA nRF52 USB CDC BLE Demo
Earlier, when trying to install some Nordic software, it reported that the serial no. was E975D83DCAB1 (same as mac address).
If this device is plugged into the usb c port of the HP EliteDesk, the blue led blinks even when the PC is powered down! You can also detect it from the Raspberry Pi (Kali) Bluetooth GUI with when the PC is powered down!
The Internet Privacy Guy, Rob Braxman, in a YouTube video claimed that when the new iPhone's are powered down, BLE is still working.
You can download the specification sheet from RayTac's support page [2] or directly by clicking on reference [3]. The specification sheet has a link to the User Manual [4].
This is an advanced project that will take a lot more than a few hours to complete. It will probably take days if not weeks.
Having said that, it has great potential. It can be turned into a low cost BLE packet sniffer that works with Wireshark [6]. According to page 1 of it specification sheet [3], it has a range of:
- 120 meters in open air with a speed of 2 Mbps
- 250 meters in open air with a speed of 1 Mbps
References
- Youtube - David-Bombal - Why People Buy the WRONG Laptops for Hacking & Recommended Bluetooth Adapters
- RayTac Support
- RayTac MDBT50Q-CX-40 Specification Sheet
- RayTac - User Manual of MDBT50Q-CX (nRF52840/nRF52833-based USB-C Dongle)
- BLE Sniffer Basics + Comparison Guide (Updated 2025)
- Master BLE Sniffing: nRF52840 USB Dongle & Wireshark Guide
- Nordic Semiconductor - nRF52840 Dongle - Getting Started
- Nordic - nRF Connect for Desktop - Requirements and installation
- Nordic - nRF Connect for Desktop - Supported operating systems
- The nRF52840 USB Dongle Tutorial (Part 1)
- Segger Website for Installing J-Link/J-Trace
Miscellaneous
The practice of replacing letters with numbers in a password is referred to by hackers as munging (p22)
obsidian free program
- David Bombal - YouTube - OSINT tools to track you down. You cannot hide (these tools are wild)
- https://www.operationprivacy.com/
Where to get started
References
Rufus
Rufus is a Micosoft Windows unitlity for creating bootable USB drives. it is not available for Linux.
There are two Windows versions of Rufus. A portable version that does not need to be installed and can run from a USB drive, and the regular version that installed into the OS.
If you use Rufus to create a bootable Kali Linux ISO USB drive, then before you begin, you need to temporarily disable Microsoft Defender Real Time Protection or else Defender will flag some of files as virus or malware, and they will not be inclued on the bootable drive. In my case, this gave a repeatable error on the installation at "Select and Install Software". See Stack Echange : Kali installation failing at "Select and Install software" .
Settings -> Privacy & security -> Windows Security -> Virus & threat protection ->
Virus & threat porection settings -> Manage Settings - Real-time proction = off
Balena Etcher
Balena Etcher runs on Microsoft Window, MacOS, and Linux. It hides your system drive to avoid accidentially wiping your entire hard drive.
Currently, there is a problem installing Balena Etcher on Debian 13 based distributions. Etcher depends on libgdk-pixbuf2.0-0 and the maintainer of package has changed the name to libgdk-pixbuf-2.0-0. See Debian 13 "Trixe" Unsatisfied dependencies #4543